How to Combine Two Images with AI: Step-by-Step Guide & Prompt Templates
A practical guide to combining two images with AI. Learn tested prompt formulas to keep faces and lighting consistent, fix perspective mismatches, and avoid blending artifacts.
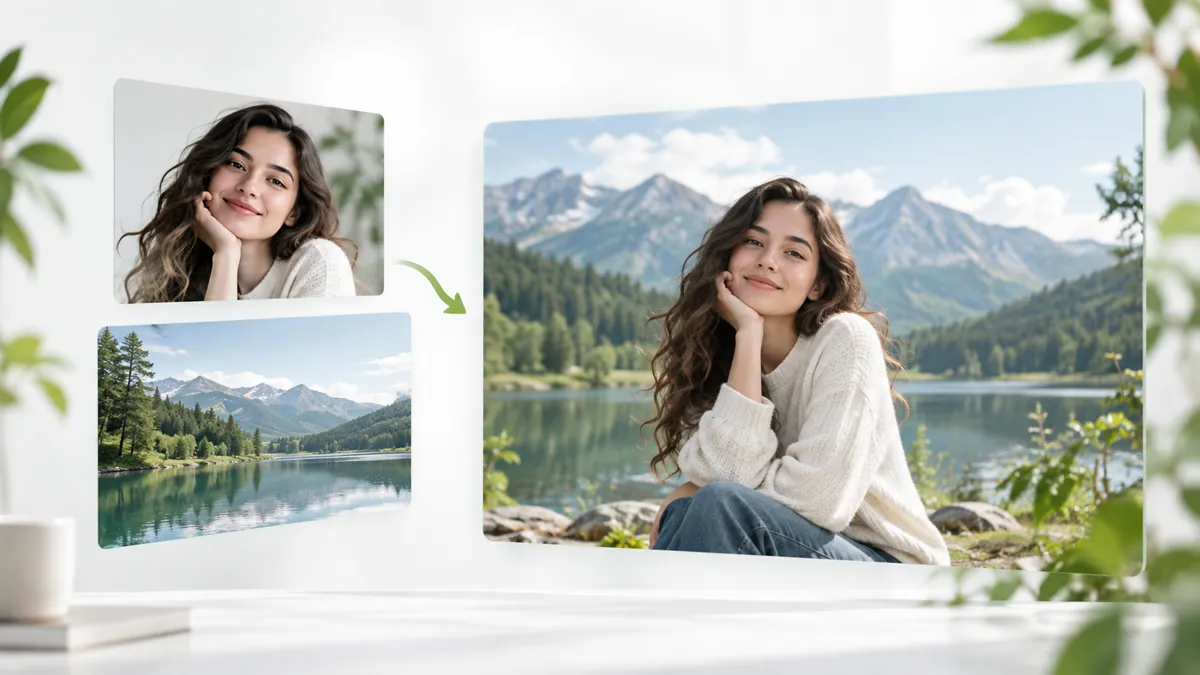
Combining two images seamlessly has traditionally required hours of manual masking, feathering, and color matching in Photoshop. Modern AI image combiners make this possible in seconds, but getting realistic results still demands precision. The model needs explicit boundaries for every element, from lighting angle to facial proportions.
Whether you want to place a portrait into an exotic location, merge two separate photos of people into a natural group shot, or turn a studio product shot into an engaging lifestyle scene, this guide walks through the exact workflow, prompt patterns, and troubleshooting steps our team uses daily.
How to Combine Two Images with AI (Step-by-Step)
The difference between an awkward cut-and-paste collage and a photorealistic composite comes down to preparation and prompt specificity. Follow these three steps.
Step 1: Select and Prepare Your Source Images
Every multi-image composition starts with clear role assignments:
- Image 1 (Primary Subject): The person, product, or object you want to feature.
- Image 2 (Context / Environment): The background, room, lighting style, or complementary person.
To get clean blending without bizarre artifacts, keep these input criteria in mind:
- Match Camera Perspective: Check the eye level. If your subject was photographed from a low angle, putting them into a high-angle overhead background will look unnatural. Try to pair images shot from similar eye levels.
- Prioritize High-Resolution Portraits: When preserving faces, choose clean, front-facing or 3/4-angle photos with sharp focus on the eyes. Blurry or low-resolution crops force the AI to invent facial details, often resulting in likeness drift.
- Check Lighting Consistency: Pairing a subject bathed in harsh direct sunlight with an overcast, moody background creates conflicting shadows. Whenever possible, pick references with compatible light quality and direction.
Step 2: Write a Structured Prompt (The 4-Part Formula)
A common mistake is submitting generic instructions like "combine these two pictures." Diffusion models blend features indiscriminately when you do not define boundaries.
A high-yield prompt structures instructions across four distinct layers:
- Role Attribution: Specify exactly what comes from Image 1 and Image 2.
- Preservation Anchors: Explicitly list what must remain untouched (facial features, clothing texture, brand logos).
- Environment Harmonization: Instruct the model to match ambient lighting, contact shadows, and depth of field.
- Negative Constraints: State what to avoid, such as floating subjects, double shadows, or smoothed skin textures.
Weak prompt: Combine these images into one photo.
Tested Photorealistic Prompt
Composite the person from Image 1 into the beach sunset scene from Image 2. Keep the person's exact face, hairstyle, body build, and clothing from Image 1 completely unchanged. Match the golden-hour lighting from Image 2, adding soft warm rim light on the subject's hair and shoulders. Ground the subject naturally with realistic sand contact shadows. Photorealistic 35mm photography, natural film grain, sharp focus, no distorted limbs.
Step 3: Inspect Key Blend Points and Refine
Once the first render completes, evaluate the composition methodically before accepting it. Look closely at these critical integration zones:
- Contact Shadows and Grounding: Check where the subject touches surfaces (shoes on pavement, objects on tables). Lack of ambient occlusion creates a floating appearance.
- Face Likeness and Edge Bleed: Zoom in on hair edges and skin tones to ensure colors from the background have not bled into the face.
- Light Source Direction: Verify that the highlights on the subject correspond with the primary light source in the background scene.
- Hands and Fine Anatomy: Inspect fingers and limb joints for extra digits or unnatural bending.
If the first output is slightly off, refine one variable at a time. If the subject looks pasted on, add prompt constraints like: "add realistic ambient occlusion contact shadows where the subject meets the ground". If the face shifted, add: "strictly preserve the original facial identity, eye shape, and expression of Image 1".
Core Use Cases and Targeted Prompt Templates
Different composition scenarios encounter distinct challenges. Below are tested formulas for the most common use cases.
1. Combining Two People into One Seamless Photo
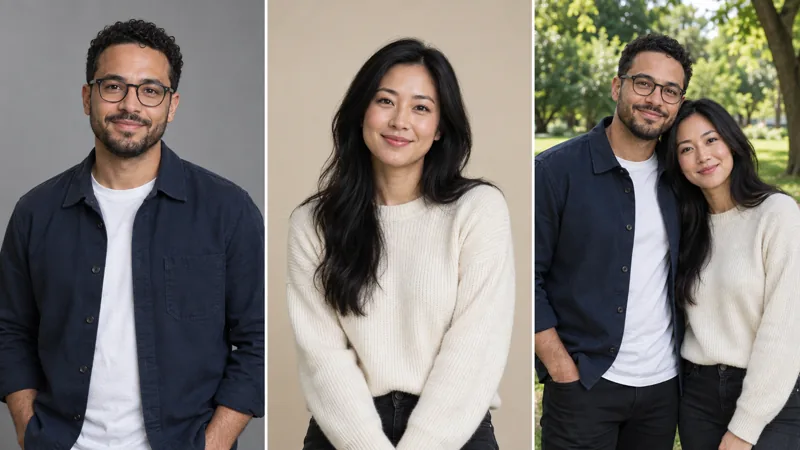
Bringing two people together who were photographed miles or years apart is one of the most meaningful uses of an AI combiner. Common applications include long-distance couples, family members who could not attend a holiday gathering, or tribute memorial photos.
The primary difficulty here is maintaining relative scale, matching eye heights, and making the interaction feel authentic without faces morphing into each other.
Two People into One Photo Prompt
Generate a realistic indoor living room portrait bringing the man from Image 1 on the left and the woman from Image 2 on the right together side by side. Keep both individuals' original facial features, exact expressions, and clothing styles recognizable and intact. Harmonize the soft window lighting across both subjects with consistent shadows and depth of field. Natural documentary photography, realistic skin textures, 50mm lens perspective.
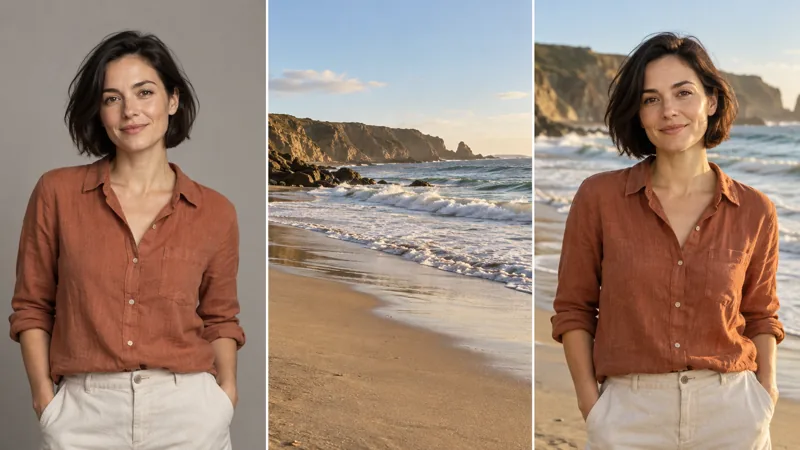
2. Placing a Person in a New Scene or Destination
Whether updating a personal headshot, creating travel memories, or changing an unsightly background, this requires precise edge handling and atmospheric matching.
Person + Background Replacement Prompt
Place the woman from Image 1 seamlessly into the modern cafe interior from Image 2. Situate her naturally behind the foreground table. Preserve her exact face, hair, and outfit from Image 1. Blend the ambient indoor lighting so that warm overhead pendant reflections fall naturally on her shoulders and hair. Subtle shallow depth of field, sharp foreground subject.
3. Commercial Product Placement in Lifestyle Settings
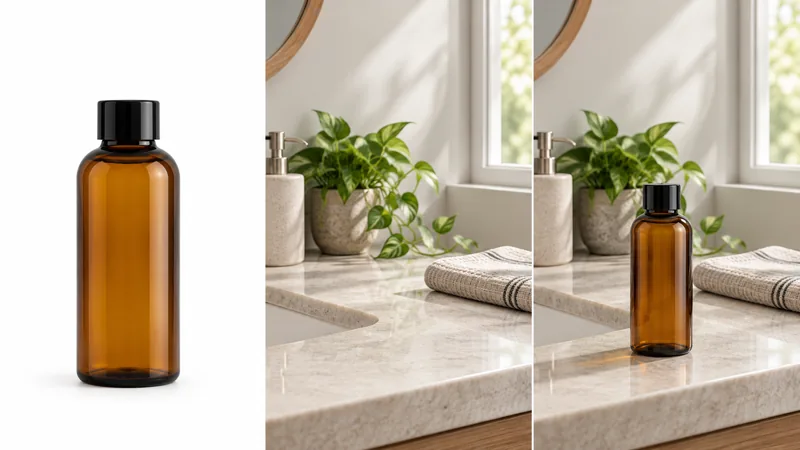
For e-commerce brands, placing a clean white-background product packshot into a styled living room, kitchen, or outdoor environment creates high-converting imagery at a fraction of a studio shoot cost.
Preserving packaging geometry, labels, and exact product colors is paramount.
Product Lifestyle Composite Prompt
Place the skincare bottle from Image 1 onto the wet marble bathroom counter shown in Image 2. Keep the bottle's exact shape, label typography, cap color, and proportions unchanged. Cast soft directional morning light from the left, producing realistic contact shadows and a subtle reflective sheen on the marble surface. Editorial product photography style.
4. Wardrobe and Style Transfer
Transferring garments from a fashion lookbook onto an existing portrait allows previewing styles before purchasing or creating customized fashion mockups.
Clothing Transfer Prompt
Dress the man from Image 1 in the tailored wool coat and scarf from Image 2. Retain the man's head, facial identity, hair, pose, and physical proportions from Image 1. Fit the coat naturally around his shoulders and torso, matching the natural fabric drape, texture, and creases. Consistent daylight studio lighting.
AI Image Combining vs. Traditional Image Stitching
Understanding what AI image combining does compared to standard photo stitching helps you choose the right tool for the job.
| Editing Goal | Recommended Tool | Why |
|---|---|---|
| Merge two separate people into a believable joint photo | AI Image Combiner | Rebuilds shared lighting, perspective, and natural body spacing |
| Transport a portrait into a brand-new background | AI Image Combiner | Matches color temperature, rim lighting, and depth of field automatically |
| Place a plain product shot into a luxury lifestyle setting | AI Image Combiner | Generates physical surface reflections and contact shadows |
| Place two screenshots side-by-side without changes | Image Stitcher / Collage | Preserves every original pixel without generative hallucination |
| Assemble a panoramic landscape from adjacent photos | Panorama Stitcher | Aligns matching pixel overlap along geometric seams |
| Create a classic before-and-after split graphic | Collage Tool | Maintains 100% data integrity for direct visual comparison |
Choose an AI image combiner whenever you need the physical environment, light, and perspective to interact realistically between two subjects. Use classic stitching tools when you want strict, unaltered pixel-by-pixel preservation.
Frequently Asked Questions
Bring your images together into one scene
Upload your reference pictures, describe how you want them to fit together, and let our intelligent image combiner and photo merger combine photos into a seamless composite in seconds.